Cookie
Electronic Team, Inc. uses cookies to personalize your experience on our website. By continuing to use this site, you agree to our cookie policy. Click here to learn more.

RS-232 Testing Guide

Olga Weis Olga Weis Sep 20, 2021

As you may know, a wide range of specialized equipment such as lab instruments, industrial controllers, A/V devices employed in signal management systems, etc. communicate their data via serial interfaces. To be able to check the problems appearing in serial device networks, maintenance specialists need to have specialized tools that will help them identify and resolve the issues they may face.

In this article, I’ll tell you about this advanced solution and describe how to test serial port communications in the simplest and most efficient way.

Test COM ports with a special software

So, if you have a decent serial port testing tool capable of displaying everything what’s happening in your serial network in real time, you can easily find the source of any problem and solve it with minimum efforts and time.

Serial Port Testing Software is a professional utility that gives developers a centralized place to record and display the data going through all tested serial ports. The app is designed to log everything a COM port does during a monitoring session, so programmers don’t have to document all actions by hand.
Serial Port Monitor logo

Serial Port Monitor

Log and analyze serial port activity
4.8 Rank based on 345+ users, Reviews(345)
Download 14-day fully-functional trial period
Serial Port Monitor

COM Port Tester can be applied in a great variety of usage scenarios. It’s able to monitor, read, record, save, and analyze serial data going through a specified COM port or several ones at a time. Plus, the app will allow you to emulate sending data to the required port in different formats (string, binary, octal, decimal, hexadecimal, or mixed).

Let's look at 3 main use cases.

How to analyze COM port activity

Here’s what you should do if you need to log and analyze the activity of your system’s serial interfaces. Download the app, install it on your computer and start it. After that, start a monitoring session in the following way:
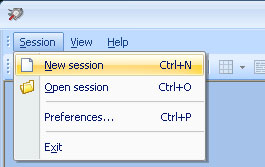
  1. Head to the main menu, select Session > New session. Alternatively, you can click ‘New’ on the main toolbar or use ‘Ctrl + N’ shortcut. Start new testing session
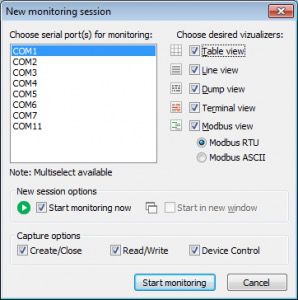
  2. Once done, you’ll see the ‘New monitoring session’ screen. New monitoring session
  3. There you should select the visualizer that will display captured serial data to you. There are four main viewing modes:

    Table: shows the table consisting of the recorded IRPs;
    Line: IRPs with details are displayed as a plain text in lines;
    Dump: shows the outgoing and incoming serial data in hexadecimal and string formats;
    Terminal: the data is displayed as ASCII characters.

    As an option, you can enable ‘Select all’ or ‘Select none’.

  4. Then, if you need to immediately begin your work, choose ‘Start monitoring now’. Also, you can start the monitoring session in new window by enabling the corresponding option.

  5. Next, you go to the ‘Capture options’ that regulate which events will be captured – create/close, read/write, or device control.

  6. Finally, click ‘Start monitoring’ and your session will be activated.

In case you need to save the session, choose ‘Session -> Save session/ Save session As’ on the main menu.

How to compare serial port testing sessions

After you have saved the monitoring session, you can compare it with another session to see the differences. To achieve this, just do the following:
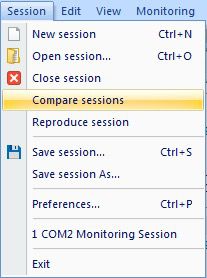
  1. Start or open a monitoring session;

  2. On the main menu, choose Session > Compare Sessions; Compare testing sessions
  3. Then, select the monitoring file you’d like to open;

  4. Now, the two sessions will be displayed side-by-side so that you can easily compare and analyze them. Comparing several testing sessions in in the invoked window

Resend the same data to a serial port

In order to test whether the problem in your serial network is fixed, you can reproduce the communication between a COM port and a serial app or device. Serial Port Monitor will help you resend the exact same data to the required COM port so that you can review the reaction of your serial software or device.

All you need to do is:
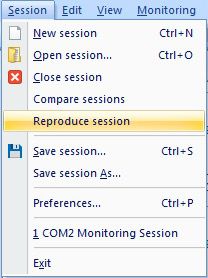
  1. Start or open a monitoring session; Start a monitoring session
  2. Choose Session > Reproduce and configure the necessary parameters:

    • Use port - specify a serial port that will be used in the reproduced communication.
    • Send requests to this port - enable this option if you want to send data to a serial port on behalf of a serial app.
    • Respond as a device - enable this option if you want to send data to a serial port on behalf of a serial device.
    • Preserve time intervals - use this option if you’d like your data packets to be sent with the time intervals.
    • Custom IO timeout - choose this option to specify Read/Write timeout parameters.

  3. Click ‘Start’.

The solution differentiates from competitors in that it offers both a user-friendly GUI and a bunch of really outstanding features like built-in terminal, advanced filtering and search options, four convenient viewing modes, support for all types of serial interfaces, including RS232, RS422, RS485, and more.

Also, with this app, you will have the option of forwarding all monitored data to the specified file or copy the captured data to the clipboard.

Serial Port Tester is a stable utility that works equally well with all versions of Windows OS, including Windows 10 (both x32 and x64). What’s great is that all internal drivers of the app are digitally signed.

How to perform an RS232 loopback test

A loopback test is a diagnostic test in which the signal returns to the transmitter after passing through the communication channel in both directions. Simply put, you can use loopback test to determine whether the device is working right. This test allows sending and receiving data from the same serial port. This method will let you easily pin down a malfunctioning port and node in a serial device network.

For RS-232 loopback test, you need to connect the transmit (TXD) pin to the receive (RXD) pin. In the differential RS-422 and RS-485 communications, you should connect the TXD+ pin to the RXD+ and the TXD- to the RXD-.

If you need to perform a more advanced loopback test which will allow hardware flow control, you should connect the CTS and RTS pins to the DTR and DSR pins in RS-232 port, and CTS+ with to RTS+; CTS- with RTS- in RS-422 and RS-485 ports.

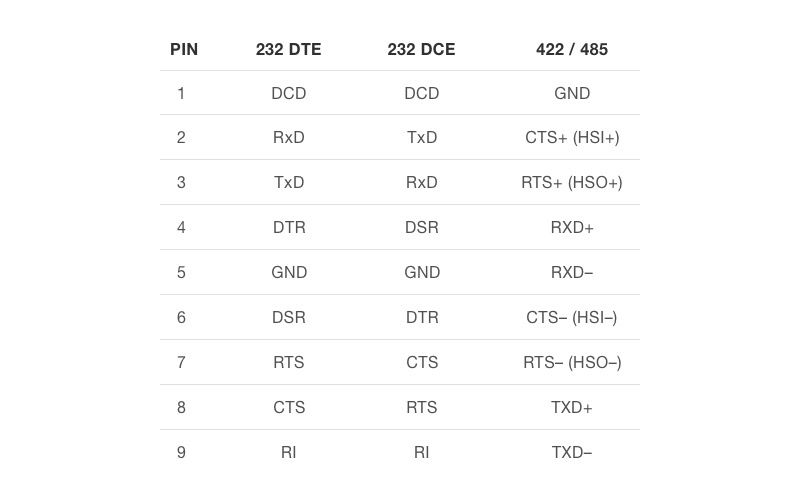
Below you can see the pinout of a common serial connector, DE-9:

De-9 Male Pinout Table

For a loopback test with no hardware flow control (marked red in Fig. 2,3 below), you connect:
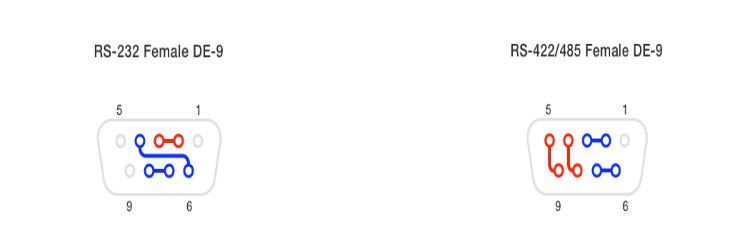
  • pins 2 and 3 for RS-232;
  • pins 4 to 8 and 5 to 9 for RS-422/485.
Loopback test

For a loopback test with a hardware flow control (marked blue in Fig. 2,3), you connect:

  • pins 4 to 6 (DTR/DSR hardware flow control) and 7 to 8 (RTS/CTS hardware flow control) for RS-232;
  • pins 2 to 3 and 6 to 7 for RS-422/485. Note that since RS-422/485 have differential connections, both of these connections are needed.

The pin numbers are often engraved in the plastic of the connector. Here is how pins are called in DE9 connector of the RS-232 serial port:

Pin numbers

Loopback Test in HyperTerminal

HyperTerminal is a program that allows your PC to function as a computer terminal and connect with other systems remotely. This program lets you interact with remote devices via a standard serial bus (RS-232) or using the telnet protocol.

As long as HyperTerminal supports data transfer via COM ports, you can use this program to perform a loopback test.
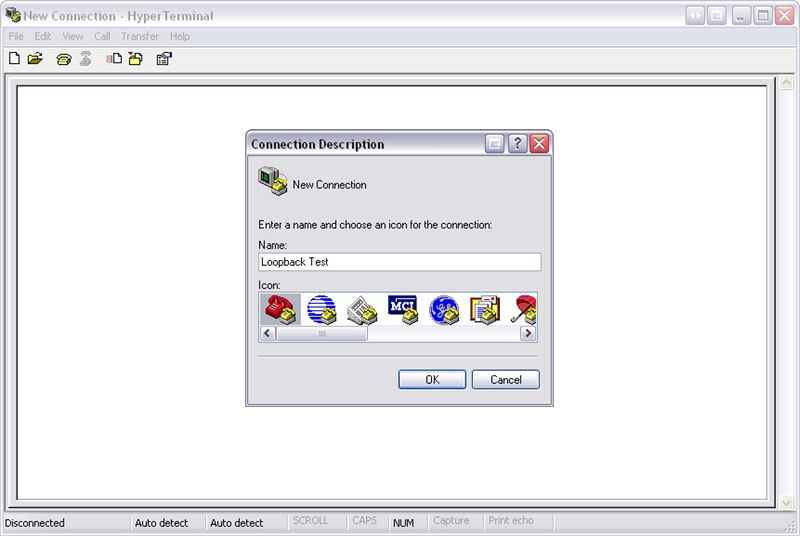
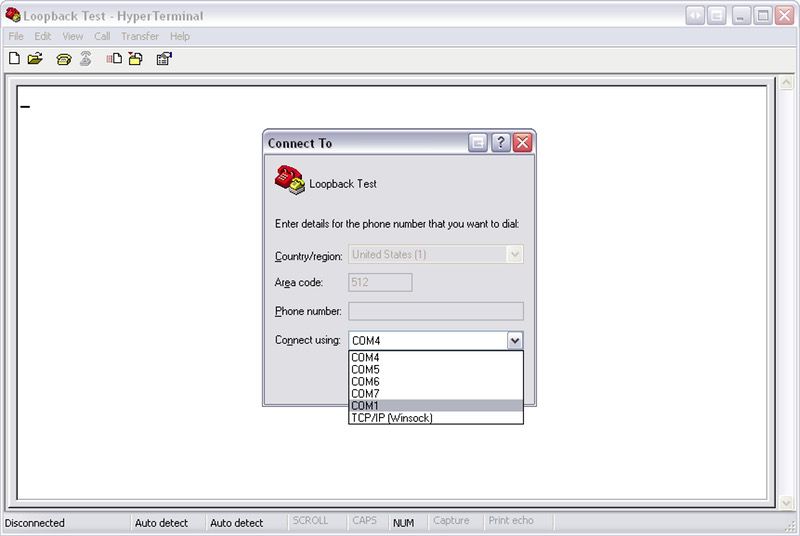
Here’s how it works:


  1. In the HyperTerminal you establish a new connection and give it a name. Select the icon for your connection. Establish a new connection
  2. Specify the communications port that will be tested. Specify communications port
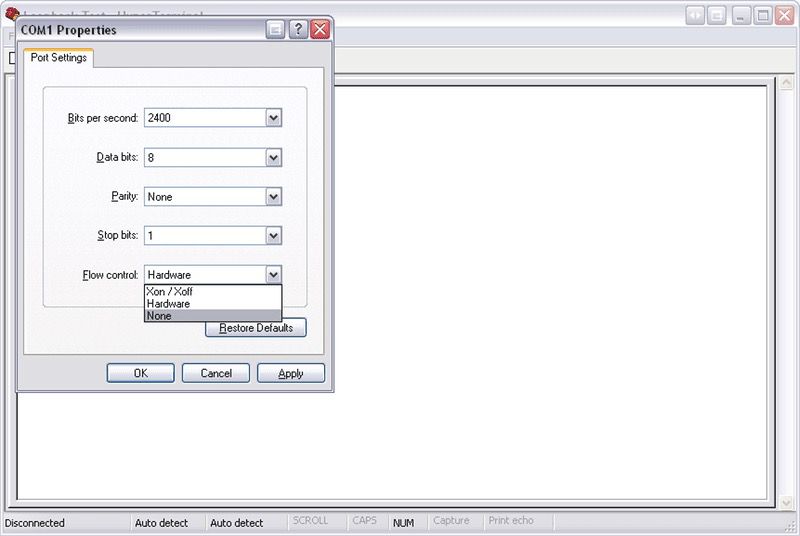
  3. Choose the type of flow control you’ll use. Here you have several options: Xon/Xoff, hardware, and none. Keep in mind that Xon/Xoff is a software flow control, so if choosing this option, you only need the TXD and RXD pins to be connected. Type of flow control
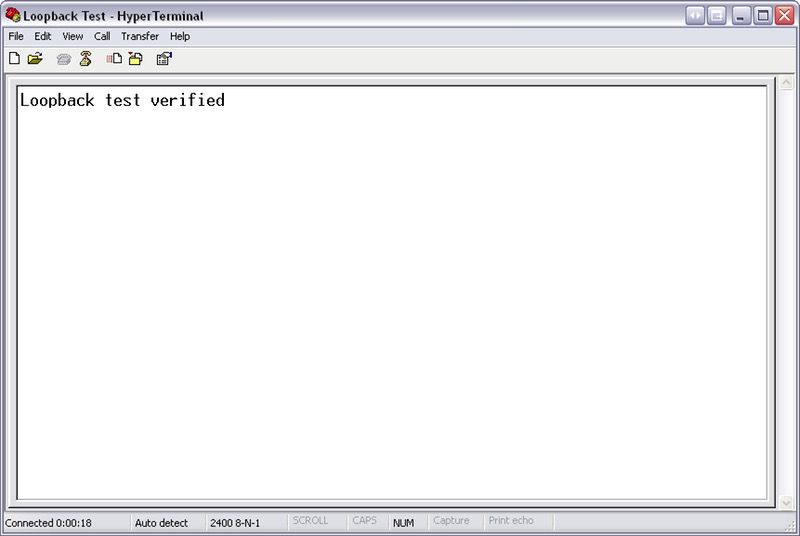
  4. Now, use your keyboard to type a message. Any data that shows in Hyperterminal is received from the device. Type of flow control

HyperTerminal is a convenient way to test you RS232 ports, but not the most efficient one.

The limited capabilities of this serial loopback test app won’t lead you to much success in controlling and debugging of your serial communications. More than that, if you’re going to use HyperTerminal on Windows 7 or 10, you should remember that these OS versions support only the private edition of the app, which is not free for commercial use.

Conclusion

There are many methods and solutions that can help you test and troubleshoot serial ports. In this article, I’ve highlighted the most common and popular ones. As you can see, Serial Port Tester by Electronic Team stands out for its powerful and versatile functionality. This serial port test tool can be used not only as a great alternative to HyperTerminal but also as a great solution for development and debugging of serial apps and hardware.

FAQ

RS232 ports can break down as a result of some negative impacts or misuse. Unfortunately, it’s not always obvious if the problem is with the COM interface or with the external device attached to it.

A handy COM Port Test program can help you check the operability of any COM port and prevent any possible problems.
Versatility. The software can be applied in a great variety of usage scenarios. It’s able to monitor, read, record, save, and analyze serial data going through a specified COM port or several ones at a time. Plus, the app will allow you to emulate sending data to the required port in different formats (string, binary, octal, decimal, hexadecimal, or mixed).

Reliability. Serial Port Tester is a stable utility that works equally well with all versions of Windows OS, including Windows 10 (both x32 and x64). What’s great is that all internal drivers of the app are digitally signed.

The ease of use. The developers of the program have provided the app with an intuitive GUI which makes the process of COM port testing as simple and efficient as possible.
A loopback test is a common way to troubleshoot RS232, RS422, and RS485 communications. It releases you of the need to connect to additional hardware in order to identify issues with a serial port, cable, or application generating requests. With the help of a loopback test, you can simulate a complete communications circuit. All that is required to do is temporarily connect the proper pins to allow signals to be sent and received on the same COM interface.
Simply follow these steps to check serial ports:

"Control Panel > Device Manager > Ports" Your system’s COM ports will be displayed.

small logo Serial Port Monitor
#1 at Serial Port Software
Serial Port Monitor
Log and analyze serial port activity
4.8 rank based on 345 + users
Get a download link for your desktop
Submit your email address to get a link for quick download on your desktop and get started!
or