3D mice are designed for precision – they stay stationary during use and allow users to navigate digital 3D environments intuitively, unlike traditional desktop mice that rely on surface movement. A popular example is the 3Dconnexion mouse, widely used by CAD professionals for its ergonomic design, advanced motion control, and powerful visualization software that delivers a smooth, reliable user experience.
However, when working remotely, many users face challenges accessing these devices over Remote Desktop Protocol (RDP). Forums like Reddit feature frequent discussions about this issue, exploring the most effective ways to make 3D mice function in remote desktop environments.
In this article, we’ll look at the two most common methods to use 3D mice over RDP – helping you choose the approach that best fits your workflow.
Access 3D Mouse Over RDP Using RemoteFX USB Redirection
Enabling RemoteFX USB redirection is one way for Windows users to connect USB devices to remote machines. Follow the step-by-step instructions below to set up the feature.
But before you start, please note the following:
- RemoteFX does not provide full feature support for 3D mice, whether you’re using a SpaceMouse Compact, SpaceNavigator, or another model.
- Wireless devices cannot be redirected to remote machines via RemoteFX. To use a wireless 3D mouse, connect it directly to your computer with a USB cable instead of using a 3Dconnexion universal receiver.
To enable RemoteFX, make sure you have:
- A client computer that supports RemoteFX (Remote Desktop Connection 7.1 or later).
- A virtual machine running Windows 7 SP1 or later hosted on a RemoteFX-capable server, or a physical machine running Windows 10 or later.
How to Enable RemoteFX USB Redirection
Follow these steps to enable RemoteFX and control your remote desktop apps with a 3D mouse.
On the Client Machine
1. Сlick Start 🪟 and search for the GPedit app.
2. Open the app and select Computer Configuration > Administrative Templates > Windows Components > Remote Desktop Services > Remote Desktop Connection Client > Allow RDP redirection of other supported RemoteFX USB devices from this computer. Select Enabled > Apply > OK.
On the Terminal Server
1. Select Computer Configuration > Administrative Templates > Windows Components > Remote Desktop Services > Remote Desktop Session Host > Connections > Allow users to connect remotely by using Remote Desktop Services. Select Enabled > Apply > OK.
2. Select Computer Configuration > Administrative Templates > Windows Components > Remote Desktop Services > Remote Desktop Session Host > Device and Resource Redirection > Do not allow supported Plug and Play Device redirection. Select Disabled > Apply > OK.
3. Select Computer Configuration > Administrative Templates > Windows Components > Remote Desktop Services > Remote Desktop Session Host > Remote Session Environment > Configure RemoteFX. Select Enabled > Apply > OK.
Connecting Your 3D Mouse
1. Open Remote Desktop Connection.
2. Go to the Local Resources tab and click More in the Local devices and resources section.
3. Under Other supported RemoteFX USB devices, find your 3D mouse and check the box next to it.
Once connected, your 3D mouse will be available for use on the remote desktop.
Troubleshooting
In some cases, a 3D mouse may not function correctly with RemoteFX. Microsoft users have reported and explained several reasons why this can occur.
Connect 3D mice to remote desktops with a USB Network Gate
Another efficient way to share your 3D mouse over RDP is by using reliable third-party software, USB Network Gate.
What Is USB Network Gate?
USB Network Gate is a dedicated application designed to redirect USB devices over RDP, in virtual environments, and across network connections. It fully supports RDP sessions, making it ideal for remote access to shared 3D mice.
A major advantage of USB Network Gate is its user-friendly interface, which simplifies the process of sharing various USB devices during remote desktop sessions. Many users find it particularly convenient when redirecting complex USB peripherals such as 3D mice, gaming controllers, and 3D printers.
For users working in multi-user environments, USB Network Gate also offers an advanced USB device isolation feature. This allows you to hide your shared 3D mouse from other user accounts or sessions, ensuring privacy and full control over device access.
Here’s how you can redirect your 3D device over RDP with a USB Network Gate:
Step-by-step instructions
1. Download and install a USB Network Gate on the machine that needs remote access to the 3D mouse via RDP and the machine that provides such access. Attach the mouse to the latter one using a USB cable.
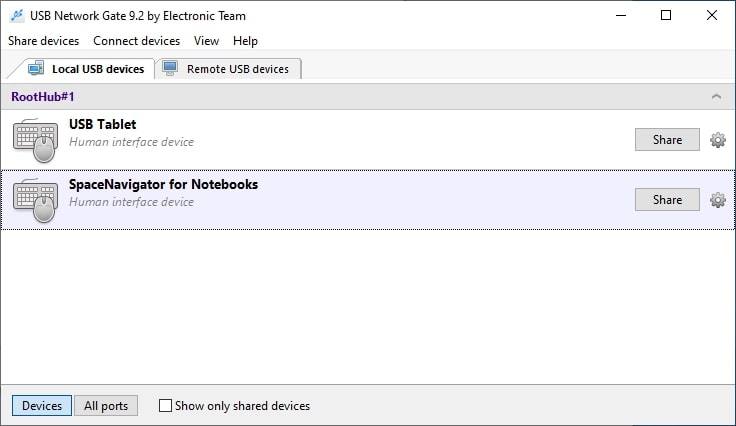
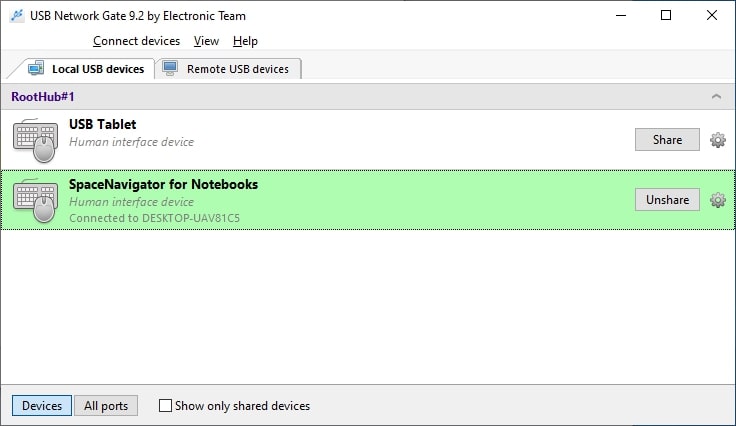
2. Start the app on the machine to which the device is connected physically and open the Local USB Devices tab. Find the mouse on the device list and click the Share button.

3. Connect to your remote virtual desktop over RDP.

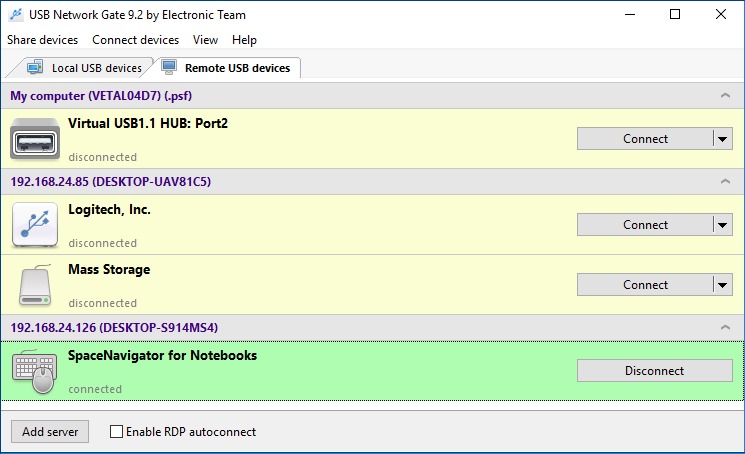
4. On the virtual machine, start the app, open the Remote USB devices tab, locate the mouse, and click Connect.

5. That’s it. The 3D mouse is now connected to the remote virtual desktop and is available for use.
Video Guide
Comparing Two Methods to Redirect a 3D Mouse Over RDP
| Feature / Aspect | USB Network Gate | RemoteFX USB Redirection |
| Type | Third-party USB redirection software | Built-in Windows feature |
| Setup Complexity | Simple, guided setup via a user-friendly interface | Requires manual configuration through Group Policy Editor |
| Device Compatibility | Supports a wide range of USB devices, including complex ones like 3D mice, printers, and controllers | Limited device support; some advanced 3D mouse functions may not work |
| Wireless Device Support | Yes, supports both wired and wireless devices | No, wireless devices cannot be redirected |
| Performance & Stability | Optimized for remote access, stable even over WAN connections | Basic functionality, may experience lag or limited control options |
| Multi-User Environment Support | Includes device isolation – lets you hide a 3D mouse from other user sessions | No device isolation options |
| Best For | Users needing reliable, flexible USB redirection for various devices | Users who prefer a built-in Windows option for basic 3D mouse access |
In summary:
- USB Network Gate offers greater flexibility, wider device support, and a smoother setup experience — ideal for professional or multi-user environments.
- RemoteFX USB Redirection is a simpler built-in solution suitable for basic use cases, but with limited functionality and compatibility.
